Subaru Legacy BN/BS (2015-2019) Service Manual: Installation
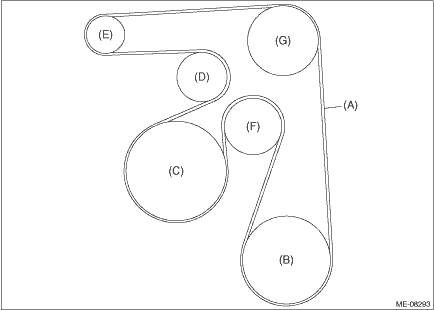
1. V-BELT 1. Attach the tool to the V-belt tensioner assembly, and rotate the tool clockwise to remove the V-belt as shown in the figure. CAUTION: • When reusing the V-belt, wipe off dust and water with cloth. • Do not use the V-belt if there is any oil, grease or coolant on the belt. • Be careful not to rub the V-belt end surface with bare hands; exposed core may cause injury. • Wipe off any dust, oil and water on the groove of each pulley with cloth.
2. When working on the vehicle NOTE: When working on the vehicle, perform the following steps also. (1) Install the V-belt cover. Tightening torque: 6.5 N·m (0.7 kgf-m, 4.8 ft-lb) 2. V-BELT TENSIONER ASSEMBLY 1. Install the V-belt tensioner assembly. NOTE: When installing the V-belt tensioner assembly, insert the protrusion of V-belt tensioner assembly into the hole for preventing rotation at the generator bracket.
Tightening torque: 25 N·m (2.5 kgf-m, 18.4 ft-lb) 2. Install the V-belts. V-belt > INSTALLATION 3. IDLER PULLEY 1. Install the idler pulley. NOTE: When installing the idler pulley, be careful of the idler pulley cover direction.
Tightening torque: 36 N·m (3.7 kgf-m, 26.6 ft-lb) 2. Install the V-belts. V-belt > INSTALLATION | ||||||||||||||||||||||||||||||||||||
 Inspection
1. Check the V-belt for cracks, tear or wear.2. Check the V-belt tensioner assembly and idler pulley for deformation, cracks or other damages.3. Check that the V-belt ribs are securely placed on the r ...
 Mechanical(h6do)
...
Other materials:
Dtc b28a6 internal stereo camera communication 1
Detected when communication error occurs inside the stereo camera.DTC DETECTING CONDITION:Communication error occurs inside the stereo camera.TROUBLE SYMPTOM:All functions of EyeSight system do not operate.STEPCHECKYESNO1.CHECK RESTARTING.1) Turn the ignition switch to OFF.2) Start the engine.3) Rea ...


